Zoom – Video Conference

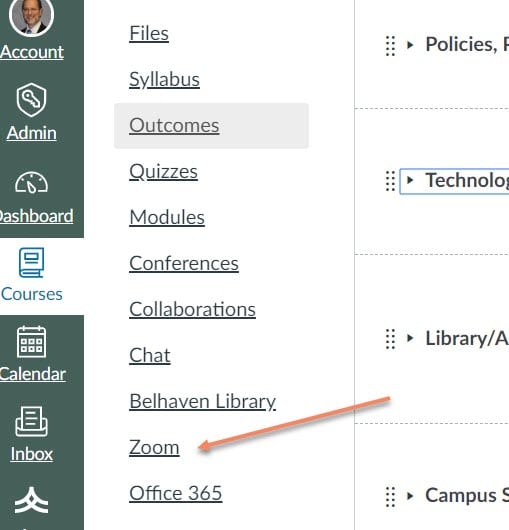
You probably are already aware that you have access to a powerful video conference tool from inside Canvas, titled Zoom.  I’ve included a picture of the link.  Zoom is very easy to use and intuitive, meaning that you should be able to use it with only a little trial and error. Below I’m going to discuss Why you might want to use Zoom, and How to set it up and use it.

WHY

I’m going to list several scenarios in which you might benefit from using Zoom:

  • As a way to have team project meetings. One of the barriers to team project meetings is the problem of coming out one more night, or getting to class early. Either option might be impossible. With Zoom, you can set up a team project meeting anytime during the week or weekend that works for your entire team.
  • To record a presentation or tutorial.  Zoom is perfect for recording a presentation or tutorial of some computer application.  Whatever you can see on your desktop can be shown through Zoom and recorded and made available to your classmates or the instructor.
  • To set up an optional (strictly voluntary) class meeting relative to a specific event, e.g. you could set up a Zoom to discuss political debates following the debates while everyone is still fresh.
  • These are only a few ideas, but I’m sure you are getting the idea.

HOW

Starting a Zoom is very easy, all you will need is your Belhaven login and password.  Once you click on the Zoom link you will want to “Host” a meeting after you enter your credentials.  To invite others email them the link.  I’ve included a video below which walks you through the process.

Let me know how it works for you.

Using Google Docs/Slides for Team Collaboration

As I’ve mentioned in other posts, collaboration on team projects can be challenging. Getting everyone together to work on the project is part of the problem. Trying to arrange schedules so that all those involved can participate and get on the same page can be difficult if not impossible. When you can’t get everyone together you run the risk of miscommunication and mis-aligned goals and responsibilities, leading to frustration and possible failure.

The other major problem is tracking the deliverables of everyone on the team to make sure they are getting their work done and submitted in a timely manner.  When you can’t track how the other team members are progressing on their part of the project it can create a great deal of anxiety for the rest of the team, and when it is discovered that an important part of the project hasn’t been delivered on time, anger and finger-pointing follow.

Here is a process which I believe will prove effective for moving your team project through to completion.

  1. Once the group members have been identified, agree on one individual to take the point in communication and logistics.  The point person should immediately set up a google doc with the file name Course#-Covenant and invite everyone to share editing privileges with the team.  You can find more on the team covenant in my previous post HERE. The Instructor should also be invited to share the document to view participation by the whole team.
  2. The first week, either meet as a group to discuss the Covenant, or the point person sets up a Zoom conference, using the link in Canvas, with the whole team at an agreed upon time to dicsuss the team covenant and finalize it.
  3. No later than week two the group meets again to parcel out the responsibilities of the group for the project. I would include those at the bottom of the team covenant on the google doc for everyone to see.
  4. Still in week two, the point person should now create a google doc for the project: Course #-Project Name and share it with the group and the instructor.  The point person should also create a google slide for the project: Course #-Project Name.  The google doc will be the working document for those who are writing the paper and doing the research.  The google slide will be the presentation document for the in-class presentation.  The benefit of this document and slide presentation is that it is easy to see who has added what, and when.  It will be easy for the whole group to work on the document/slide at the same time or separately, so everyone will know the status of the entire project at all times.
  5. Each week the point person should set up a regular meeting either in person, or through Zoom, or by chat while in the document or the slide to discuss the progress and potential areas for improvement. If you see someone is not keeping up with their area of responsibility, make sure to call them on it based on the covenant early-on.
  6. Every team member should take responsibility for enforcing the covenant and confronting stragglers. If you follow this process you will not only have a better chance of submitting a superior project, it will also improve your skills in working across a distance on team projects, which can be cited on your resume.

OK, now it is your turn – what does this process miss and what do you recommend as a solution?

Team Projects

Team Projects are often the most dreaded part of a course. While not all our courses include a Team Project, there are still several which do. So, the question is, “What can I do, personally, to make the team experience a positive one (and also get a good grade)?”  I’m glad you asked. Here are several ideas for improving the outcome of your team project:

  1. Make sure you complete the Team Covenant the first meeting of your team. This can be found on Blazenet under StudentLife/Services in the Documents. While completing this may take a few minutes, the value comes in having everyone on the same page – especially when it seems like some in the group are dropping the ball. Calling out those who aren’t complying with the Covenant expectations may be necessary, but it is much easier if the Covenant exists
  2. Make sure everyone has a copy of the Team Evaluation rubric. This can be found in the same place on Blazenet. The important thing here is to make clear to everyone up front that you are going to be brutally honest in completing this form at the end of the project.
  3. Do your best to stay engaged in the Project, completing the expectations assigned to you. Don’t hesitate to check in with other team members on their progress.
  4. I HIGHLY recommend you use either a Google Doc and/or Google Slides for your project and include the Instructor.  Both of these are free, and it can easily be determined who contributed and how much they contributed.  The team leader should start the Document/Slides and then share it with the rest of the team members.  That way you can all work from different locations at the same time on the same presentation or document. Both also have chat capabilities built in so you can “talk” in real time about the project.
  5. You may not have tried it before, but Canvas has a Zoom link on the left panel which can be used for video conferencing and screen sharing. This means you don’t have to set up another time to get together, you can video conference. This is a simple product and it works great – you can also record the session to further prove who participated and who didn’t. Just identify who will be setting up the meetings.

Team projects, when done effectively, can enhance your knowledge and skills. If you incorporate group software like I describe above it can also make you more valuable at work.

Presentation Tips, pt. 2

Last time I shared with you some tips about speaking in public which should help as you make your presentations in class, and throughout the rest of your life. I know from personal experience that the more presentations you make, the more confident you will feel. There are a couple of specifics I want to mention in this post.

First, there is a presentation rubric, found in Student Live/Services – Adult and Graduate under forms. I am including it below. The reason I include it is because if you study the rubric before you even start building your presentation, you are more likely to hit the target points, which will give you a better presentation overall, and a better grade.  Keep in mind your Instructor may be using a different rubric, SO ALWAYS ASK  about how you will be graded as soon as the assignment is made:

Second, your presentation aid, probably Powerpoint or Google slides, does make a difference.  In the last post, there was a point which shared the 10/20/30 rule.  This rule of thumb indicates that you should try to use no more than 10 slides for a 20-minute presentation with a font size of 30. This is a good practice to follow. Always try to use images instead of words on your slide so your audience won’t spend their time reading the slide. Also, NEVER just read your slides. Yes, you will read some SHORT bulleted points, but by and large, your comments should augment the slide, not parrot it.  Remember, if printing handouts from your powerpoint, choose the option from the print screen to print “handouts” three to a page with a space for taking notes. This is faster and uses less paper.

Hope you find this useful.

Blessings,

Dr. Upchurch


Presentation Tips – pt. 1

OK, you’ve been assigned to make a presentation in class. It might be a solo presentation or as part of a group, either way, it still means standing up in front of your classmates and the Instructor and talking. I’m going to make this post in two parts. The first part, which I will cover below will discuss the speaking part.

Fear of public speaking is one of the most universal fears that we have.  There are a few things you can do to make your presentation a success, regardless of your experience.

  1.  Almost everyone feels nervous just before starting – this is normal, you won’t die and the nervous feeling usually fades within 60 seconds of starting.  Don’t let the butterflies get the better of you.
  2.  Take some deep breaths just before starting your presentation, this oxygenates your blood and helps your brain, which hopefully will help you get focused and get through those first 60 seconds.
  3.  Know your material.  This can’t be emphasized enough.  Winging it will almost always allow for distractions and usually, it is obvious to your audience that you aren’t prepared.  You can only blow smoke for so long before it becomes apparent that you don’t know what you are talking about.  Know your material THOROUGHLY.  Go over it repeatedly until you can deliver the information from a knowledge base, then if you get distracted it will be easier to get back on track.
  4.  Rotate your eye contact every 2-7 seconds and look people directly in the eyes.  You will find this is a powerful method to build audience engagement.  It also lowers your own anxiety as you will be directing your comments at one person instead of thinking about the larger audience.  Pay special attention to your supervisor if there is one present.  Don’t forget the back of the room or the wings.
  5.  If you are using technology have a plan B in mind if it were to fail.  I have seen this happen all too often and when it does it often throws the speaker completely off track.  Think about it ahead of time and be able to move forward in spite of these difficulties.  This builds your credibility and enhances your image in the eyes of your supervisors, which is a nice benefit of something that could be a disaster.
  6. If you are using PowerPoint or something similar, follow the 10-20-30 rule. 10 slides, 20 minutes in length, 30 point font.  Only use text where necessary, otherwise, use graphics to communicate.
  7.  “Leave them longing rather than loathing.”  Keep track of your time and make sure you stay within the allotted time frame for your presentation.  Going over your time is one of the most frustrating things you can do both for audiences and event organizers.  You may feel like your content is worth it, but likely there are many others who won’t agree.  Leave them longing rather than loathing.
  8.  Be organized.  Make sure your material is presented in a sequence which is easy for an audience to grasp.  This is why so many people use points, e.g. point 1, point 2, etc.  People like to see patterns and understand the sequence at an emotional level.  Your organization can contribute to their understanding of your material or being so confused that they go away empty.
  9.  Jokes are good, especially at the start, to ease everyone into the presentation.  However, if the joke is off-color or offensive in any way it will overshadow anything else you say and damage your credibility.  Make sure you look at the joke from the receiving end and consider whether it could be offensive.  Better no joke, than an offensive joke, this goes double for off-color jokes.
  10.  Examples and illustrations spread throughout the presentation help communicate with the audience and lets them identify with you or the material.  It helps make sense of large amounts of data.  You can overdo this, refer to point 6 above.
  11. Those new to speaking in public often fall into the trap of using filler words or expressions such as “uh.” This is always annoying and in extreme cases can completely derail communication of your subject. Practice your speech/presentation before a mirror and record it. Afterward, count the number of filler words used and work on reducing the number.  This comes with practice and intentionally working to overcome this habit.
  12. Use pauses in place of filler words to give yourself time to think and to allow your message to connect. Usually no more than a few seconds, pauses placed strategically throughout the presentation can greatly enhance communication.  As with filler words, practice in front of a mirror and record, then review and think about where a pause would have the best impact.


Why Google Slides works great for group projects

Many times you are assigned a group or team project that will result in a presentation. In many cases, the work is divided up by having one person create the presentation, typically in PowerPoint while others are assigned other parts of the project. The problem with this is that it is usually the same person who creates the PowerPoint and the other students have little or no input into the final presentation, nor do they become familiar with creating presentations.

Google slides is GREAT for team projects because it allows multiple people the opportunity to work on the presentation from different locations AT THE SAME TIME. So, each person in the group could be assigned to create 2-? slides relative to their portion of the content, and everyone can see and comment on each other’s work as the project progresses.  I’ve included a tutorial below from Youtube.  One person would create the project and then share it with the others in the group so everyone can access it and add their portion.

Presenting in class is a snap, just log into your Google Drive account (be sure to open an incognito window in your browser to avoid accidentally leaving your login information) and run the presentation.  You could even add the Instructor to the project so they can see what’s happening.  Even better, it is possible to see who created what, so there is no question about some team members slacking while others do all the work!