After 9:00 Activity – Kahoot!

I know you are always on the lookout for an activity to use after 9:00 that will actively engage students and make that last hour meaningful.

Here is one activity that will do that. Kahoot.  Kahoot is a classroom engagement software that is free to instructors and provides an interesting way to engage students in content.  I’ve included some links to a couple of tutorials about how to use Kahoot below.

It will involve you setting up the activity in advance but on the plus side it can be used over and over again as you teach the class.  This would make a great test-review session and could spark some interesting discussion as well.  Don’t be put off that the tutorials are based on secondary education models – this will work just as well for adults in that last hour of class.  I’ve been in a session when this was used and I can personally vouch for how effective it is.

Please post a reply to this if you use it and let me know how it went.

Kahoot! Demo for Teachers

5 Minute Guide to Kahoot!

How to Use Kahoot! in the Classroom

You can search for more tutorials on YouTube if needed.

Setting the Table . . . Insights on Andragogy from IWU

There are a lot of resources available for Instructors to draw from to improve their ability to achieve student learning both in and out of the classroom.  At this LINK you will find an excellent resource from Indiana Wesleyan University Faculty Development Blog.  This particular session deals with group work within the classroom and how to organize and manage group work effectively.

In this series on “Setting the Table” from Indiana Wesleyan you will find other presentations which will hopefully inspire you to try something new and see your role in a fresh light.

Related Webinars

Avoiding Dysfunctional Team Project Groups

An effective Team Project Group can be a valuable experience.  Student are enriched by enhancing their teamwork skills and can find the experience rewarding.  However, it seems for every successful team project group, there are as many which are dysfunctional in one way or another.

As harsh as this may sound, if a team project group is dysfunctional YOU as the Instructor may be to blame.

An effective team project group is a learning process which is guided by the Instructor.  The establishment of the group and facilitating their ability to work together toward a goal is an aspect of the learning outcome for the course which is just as significant in many cases as the content being studied.

So, how do you take ownership for avoiding, as much as humanly possible, a dysfunctional project team?

  1.  Make sure you take the time in the first class session to establish the Team Project Charter.  There is a good post on this HERE.  Establishing the Charter is the starting point for a high performance team.
  2. Take responsibility for facilitating the Team by providing a short period within each class period to meet with each team, working on the content AND the dynamics of teamwork.
  3. Employ the tools available for effective teamwork outside of the classroom.  This can be through Canvas (see post HERE in this Faculty Blog that explains how to do that) or through use of Google Docs (see post HERE in this Faculty Blog that explains how to do that) or some other resource.   Your guidance and assistance here can make the difference in practical, pragmatic functioning of the team.

Finally, I encourage you to pray with and for your project teams and encourage them to pray for each other.  Amazing things can happen when we remember to introduce the Holy Spirit into the team dynamic.


Mind Maps for Enhanced Student Learning

To my way of thinking, mind maps are probably one of the most effective and least used tools for instruction.  I base this on the fact that most people are visual learners who validate the quote “a picture is worth a thousand words” day in and day out and who speak in terminology that reference a visual perspective, e.g. “I see” meaning “I understand.”

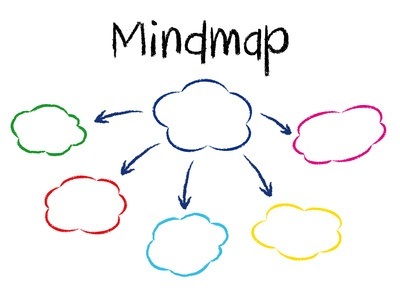
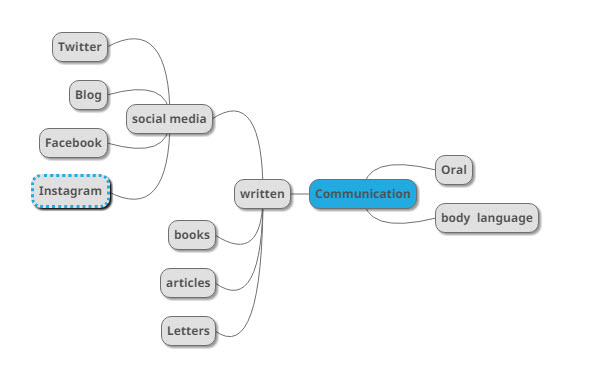
A mind map is a representation of information arranged in a visually stimulating format 
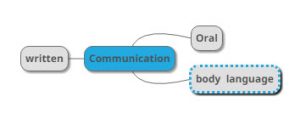
which sparks creativity and retention.  For instance, if I wanted to start a conversation about Communication, I might begin by framing it with a mind map identifying the basic types of communication.  This has the added benefit of providing structure and organization of thought to the instructional process and allows for the ability to focus on specific satellite groupings individually as well as to think about the links which might exist between different nodes.  An expansion of just one of the satellites begins to spark creativity.  Now I’m beginning to see connections within the subject and how different pieces fit into the overall concept.

The really nice thing about using mind maps in the classroom is their versatility as small group work around a table with 2-4 people, or with the entire class on the whiteboard, or even as an assignment to make sense out of a reading assign
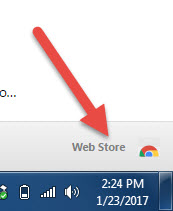
ment.  Mind maps make a great test preparation tool whether used by an individual or in a group.

The images for the mind maps included in this post come from Mind Mup which is part of the Google App family and easy to install from the Google Web Store from inside Chrome.  It is free and easy to use.    This is software which keeps things organized, easy to print and share.  There are various YouTube tutorials for MindMup and other mind map applications.

Another nice thing about mind maps, however, is that you don’t have to use any software to get the benefit of what this tool has to offer.  You can have a student go to the white board and create a basic mind map of a subject and then have other students add to the mind map or explain the linkages between different satellite groupings.

It is great for note taking, it inspires creativity, is an effective tool for student engagement, fosters collaboration, enhances retention of the subject matter, and is just plain fun.  I strongly encourage you to consider using a mind map in one of your classes soon.  Let me know how it turns out.

3 New Google Drive Features Teachers Should Know About

I know some of you are using Google documents for collaboration purposes with your students and I thought you would find this article from Educational Technology Interesting.  I particularly like the first feature which allows for easy inclusion of citations in the documents.

Check out the article: 3 New Google Drive Features Teachers Should Know About

Canvas Q & A

Recently Joe Villarreal presented a webinar on Canvas Q&A.  This contained information that EVERY instructor should be aware of.  I hope you will take the time to view the recording.  The topics he discusses in this webinar are:

  • Layout Changes
  • Help & Resources
  • Turnitin (this is EXTREMELY IMPORTANT information)
  • Favorite Courses
  • Clarify Support for Canvas

Altogether the webinar recording is 51 minutes in length.  Joe moves through the material with clarity and precision and I know you will find this time well spent.

Here is the LINK to the webinar.  You can also find it in the Faculty Resources on this site, under the list of Webinars.

Great Example for Classroom Use

I just say this post on a blog that I’m following and wanted to share it with you:  Steve Jobs on Communicating Your Core Values

The reasons why I’ve re-posted it here through the link above are:

  1. It is about a key figure in our current economy/society discussing a major brand which our students can identify with.
  2. It speaks to the fundamental importance of core values which can provide an interesting discussion.
  3. In the last sections of the article the author turns to a discussion of message and presentation, which is relevant for marketing/branding discussions.

One way I might use this in class is to either print out copies of the article or have prepared a QR code of the link to put on the screen so students can easily look it up on their mobile devices (How to easily create QR codes).  Divide the class into groups of 3-4 and assign each group to analyze the article.  Assign one group to focus on the core values and cross relevance to their lives/occupations.  Assign another group to focus on the manner of presenting the message and discuss how Job’s approach in delivering the message contributed to the Brand, potential effects for the company and then cross relevance to their own companies and their message. You can duplicate these groups if you have more students.  Then bring the class back together to debrief each topic: the core values, and the message. Remember if you don’t debrief the time spent in these groups and add your observations it is not as effective.

I’m sure you can think of other ways to use this article – please respond to this post with your ideas so others can benefit.

Blessings,

Rick

Teachers Guide to Using Google Forms

The article below comes from Educational Technology and Mobile Learning.  They do an great job on providing information to educators about technology that will enhance the classroom experience, as well as ideas about how to use technology more effectively for teaching.

This particular article deals with Google forms.  You may remember this being touched on in one of our webinars: Google Docs in the Classroom.   Google forms is a powerful application for conducting polls, gathering information, etc.  I think if you take the time to read through this guide a lot of ideas about how you can use it will come to mind.

If you have any questions or would like some personal instruction on using google forms, or just want to brainstorm on a teaching idea, don’t hesitate to contact me: rupchurch@belhaven.edu

Teachers Guide to Using Google Forms

Google Forms is a powerful tool with huge educational potential for teachers and educators. Besides being free and easy to use, Forms works across different devices and is seamlessly integrated with other Drive services such as Docs and Spreadsheets. As a teacher, you can use Forms for a variety of purposes including: planning an event, making surveys and polls, creating quizzes, collecting feedback and other information from students and many more.  READ MORE

Although this is a separate article from Educational Technology, it bears on the above in that it shows you how to set up forms so that you can be notified when students submit responses to the form(s) you have created.

Read about this here

Project Teams – Using Canvas to Improve Outcomes

There are already some great posts on this blog about Team Projects and I encourage you to read through them by clicking on the category: Team Projects.  What I want to do in this post is to summarize some of the key points made in the webinar: Using Canvas to Facilitate Team Projects which can be found under Faculty Resources.

Canvas has a rich environment for project teams, which they label “groups.”  Becanvas1fore getting started, however, I highly recommend going to your personal settings within Canvas and take care of two tasks:  First, make sure you have uploaded a picture and bio.  Students should expect their canvas2
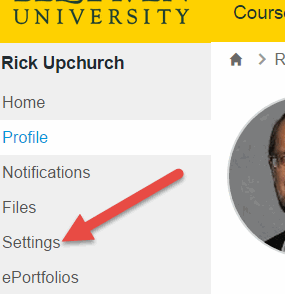
Instructors to have completed this task and they can read through this information, enhancing your credibility.  Second, go to settings and “Register” your Google Drive (gmail) account.  This does not give Canvas access to your Google Drive documents, but it does facilitate your ability to set up collaborations with your students.  Students should also be encouraged to register their Google Drive so that they can access the collaboration features available in Canvas.

Now that you have taken care of these housekeeping items.  Here is a general checklist which will get you started in using Canvas to facilitate team projects. Let me strongly suggest you also watch the webinar as well for greater details.

  1. Under the People navigation link, click on +Group Set and give it a name.  Group Sets are basically types of groups, e.g. Project Teams.  Think about the options listed there before you click on save. There are good reasons to choose one option or another and the video will help with that.  If you don’t start the groups, then they will not be available to students.  YOU ARE KEY TO MAKING THIS WORK.
  2. If you chose to set up the groups manually, give each group its own namecanvas3
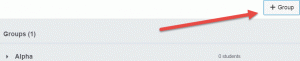
.  You can set up as many groups as you like.  Once the group is set up you can manually drag members into the groups or use the + by their name to select the group where you would like them.  Setting up a group leader is as easy as clicking on the gear icon by a name and selecting “set as group leader.”  This is usually a good idea as it gives the group better autonomy to move around within the site.
  3. Once the groups are set up you can access the group’s page by clicking on the gear icon by the group name and selecting View Group Home Page.  From here group members can post announcements, start discussions, store files, start collaborations, and conferences
  4. Conferences can be created and left open ended, but remember to click on Start so the groups have access.  This allows them to set up regular meeting times which you can join to see how they are progressing.  Please consult the webinar video for more details.
  5. Collaborations make use of Google docs, which is why you need to register your Google Drive.  The Instructor should start one shared document within each group.  This allows you, as owner of the document, to be able to easily see who is contributing and how the group is using this resource.

There is a lot more I could say, but if you watch the webinar you will get the hang of it pretty quickly.  Experiment, practice, encourage your students to participate.  I think you will find this breathing some new energy into the team projects.

Using Google Docs/Sheets/Presentations/Forms in the Classroom

The webinar: Using Google Docs in the Classroom was led today by Julien Marion.  As with the last webinar, Julien did an outstanding job in sharing the tools freely available from Google and how they can be used in the classroom.  His enthusiastic style and obvious passion for helping students came through strongly.  Marion’s presentation style is engaging and approachable.  He is obviously thoroughly familiar with the various Google products and gave examples of how he uses those products in the classes he teaches. I know those participating enjoyed the collaboration opportunities as there were many comments of of “cool.”  Which, I suppose dates us a little.

I encourage you to watch the recording as well as the previous recording, located under Faculty Resources on the Faculty Blog.  I’m confident you will learn something that you will be able to use in the classroom or for your personal life.