Visual Teaching Strategies

by Dr. Cynthia Wilkins

Rently I had the opportunity to present a webinar on the topic Visual Teaching Strategies.  I opened with an overview of John Hattie’s theory of visible learning (Click HERE for more information on his theory).  In the webinar some examples of teacher actions and instructional techniques along with their effect sizes were presented.  Some of these techniques were considered “tried and true” but were surprising in that the effect size was much lower than expected.  The webinar moved into a presentation of characteristics of the millennial student – how their lives are different from earlier generations of students, and how teaching can be adapted to accommodate these differences.  Four examples of how technology can be effectively integrated into college-level instruction were presented. At the end of the webinar I answered some of the questions which had been posted when participants registered for the webinar, such as how modifications to PowerPoint and other presentations could be modified to reduce the cognitive load, or overload, on students with a goal of helping them retain more information.

Participants responded to points in the webinar via chat messages with questions and ideas.  A one page summary of effective PowerPoint development ideas and a PowerPoint of ways to integrate technology into instruction were offered to the participants and I would be happy to send this to you if interested (email:  cwilkins@belhaven.edu).

Visual teaching strategies is a perfect match for the adult studies program as it meets the learning style of most adults.  I hope you will take time to watch the webinar.

Reading for Understanding: Motivating your students to read and understand course material!

by Dr. Larry Ruddell, Dean at Houston-Belhaven

Adult students face many challenges during the week apart from your class.  For example: traffic accidents, a relative needing help, a baby-sitter that doesn’t show up, a missed payment, and health problems … among other things. So, sitting in class may be a big accomplishment for an adult student … along with submitting any assignments … which may or may not include actually reading the course assignments!

One of Belhaven’s “Student Objectives” for Adult Learners is that upon graduation, our students will: “Incorporate ongoing learning strategies toward the fulfillment of their life goals.” One “learning strategy” that must be in place front and center is the ability to read and learn from reading.

As faculty, we face barriers in helping students with reading. Students may have a negative attitude towards reading. We are used to receiving “information” easily with the internet, so sitting down with a big book seems daunting. Text books can be dry and may actually be misleading at points or run contrary to the Christian Worldview.

How do we cope with student challenges in this particular area? I would suggest three things: expect, motivate, and explain. Let’s start with expect. You should always expect students to read all of the required course material, no matter how daunting. Our classes are short and it is impossible to cover all of the required information in class. So NEVER lower your expectation that students should complete all assigned reading before class.

Secondly, you need to motivate students to do the reading. The “go to” motivation approach according to the Bible is to appeal to others through love and truth. See Philemon 1:8-9 that reads;

Accordingly, though I am bold enough in Christ to command you to do what is required, yet for love’s sake I prefer to appeal to you—I, Paul, an old man and now a prisoner also for Christ Jesus— I appeal to you for my child, Onesimus, whose father I became in my imprisonment. (English Standard Version) [Bold added]

So, we should appeal to students to do the reading because (as mentioned above), there is not enough time to cover all the course material in class, we want them to become lifelong learners, and it is a course requirement. However, Covenantal motivation is also based on “blessings and curses” or, “rewards and punishments.” So, make sure your grading “rewards” students who do the reading and draw from the reading in papers and other assignments … and holds students accountable who fail to draw from class reading in papers and other assignments.

Finally, explain HOW TO read the required material. This may be the most difficult one for you if you have no training in learning/study skills. Pauk and Owens, in their book entitled How to Study in College, Eleventh Edition, give a crisp answer about what it takes to read more effectively, “To truly improve your reading, you need to prepare properly, navigate confidently, and learn how to strategically vary your pace.” (2014, p. 132) They then goes on to say, “Comprehension is all about connections.” (Pauk & Owens, 2014, p. 132)

Briefly, let’s list some ideas (that you can pass on to students) on how to build those connections!

  • Review assignment requirements BEFORE doing the reading
  • Read for what YOU want to get out of the reading. So try to see how any past experiences or future endeavors might apply to the content
  • Before reading in detail, just look at summaries, vocabulary (make sure you understand), read side bars, read main headings, ask questions. The more you read to answer questions, the better the comprehension and retention
  • Read in detail, spending more time on text that applies to your priorities and/or course assignments. Note that since you have already gone through all the other material, you don’t need to “stop” and change gears and look at that other material. This should improve speed.
  • Conclude the reading by taking notes that apply to completing assignments.

In conclusion, consider taking a few minutes at the end of class to go over next week’s reading and apply 2 or 3 of the motivational and/or practical tips!

References

Pauk, W., & Owens, R. (2014). How to study in college, eighth edition. Boston, MA: Wadsworth CENGAGE Learning.

Great Example for Classroom Use

I just say this post on a blog that I’m following and wanted to share it with you:  Steve Jobs on Communicating Your Core Values

The reasons why I’ve re-posted it here through the link above are:

  1. It is about a key figure in our current economy/society discussing a major brand which our students can identify with.
  2. It speaks to the fundamental importance of core values which can provide an interesting discussion.
  3. In the last sections of the article the author turns to a discussion of message and presentation, which is relevant for marketing/branding discussions.

One way I might use this in class is to either print out copies of the article or have prepared a QR code of the link to put on the screen so students can easily look it up on their mobile devices (How to easily create QR codes).  Divide the class into groups of 3-4 and assign each group to analyze the article.  Assign one group to focus on the core values and cross relevance to their lives/occupations.  Assign another group to focus on the manner of presenting the message and discuss how Job’s approach in delivering the message contributed to the Brand, potential effects for the company and then cross relevance to their own companies and their message. You can duplicate these groups if you have more students.  Then bring the class back together to debrief each topic: the core values, and the message. Remember if you don’t debrief the time spent in these groups and add your observations it is not as effective.

I’m sure you can think of other ways to use this article – please respond to this post with your ideas so others can benefit.

Blessings,

Rick

Teachers Guide to Using Google Forms

The article below comes from Educational Technology and Mobile Learning.  They do an great job on providing information to educators about technology that will enhance the classroom experience, as well as ideas about how to use technology more effectively for teaching.

This particular article deals with Google forms.  You may remember this being touched on in one of our webinars: Google Docs in the Classroom.   Google forms is a powerful application for conducting polls, gathering information, etc.  I think if you take the time to read through this guide a lot of ideas about how you can use it will come to mind.

If you have any questions or would like some personal instruction on using google forms, or just want to brainstorm on a teaching idea, don’t hesitate to contact me: rupchurch@belhaven.edu

Teachers Guide to Using Google Forms

Google Forms is a powerful tool with huge educational potential for teachers and educators. Besides being free and easy to use, Forms works across different devices and is seamlessly integrated with other Drive services such as Docs and Spreadsheets. As a teacher, you can use Forms for a variety of purposes including: planning an event, making surveys and polls, creating quizzes, collecting feedback and other information from students and many more.  READ MORE

Although this is a separate article from Educational Technology, it bears on the above in that it shows you how to set up forms so that you can be notified when students submit responses to the form(s) you have created.

Read about this here

Strategy for Using Peer Reviews to Improve Student Papers

By Kim Priesmeyer
Full Time Faculty, Belhaven Houston

As an instructor who assigns a lot of writing, I’m always looking for ways to engage students in peer review.  However, just telling students to “peer review each other’s papers” can be unproductive, or even worse, dull.  Typically, students don’t know what to do with those papers, and comments can be uninspiring.

One way to bring energy and effectiveness to the process is something called Round Robin Peer Review (also available on the Faculty Resources tab under “Other Resources).  It’s pretty easy for any instructor to use, and it can be modified for any assignment depending on the requirements.  It keeps students and papers moving, and it gives peer reviewers a specific focus.  Here are the basics:

  1. Pass out the peer review form and have each student write his name at the top where it says “writer’s name.”
  1. Tell students to pass their paper and their form to the right. They should now be holding someone else’s paper and form.
  1. Inform students that they will be given 10 mins. to critique just the first category on the peer review form. Set a timer.
  1. When the timer goes off, students will pass the paper and form to the right. The next peer reviewer will critique only the second category for 10 mins.  And so on…

Ways to modify for your course:

  • Change the categories to peer review
  • Set different time limits for each session
  • Provide critique expectations (for example, I might require a three-sentence critique minimum)

Ways to coach students before the process begins:

  • Model the process with a couple of volunteers
  • Provide examples of “critique” comments that are specific and useful
  • Tell students it’s OK for the peer reviewer and writer to communicate during the process
  • Prepare students for constructive criticism: it’s not about complimenting each other; it’s about improved writing
  • Tell students they’re not required to make suggested changes, but they must at least consider them
  • Give students permission to write on each other’s papers; peer review isn’t always neat and tidy

Give it a try and let me know your thoughts.  You can email me at kpriesmeyer@belhaven.edu

5 Excellent Rubric Making Tools for Teachers – re-post

This is from the original article which can be found HERE

Rubrics are scoring charts used to assess and evaluate a particular learning or teaching activity. As is explained in this guide, rubrics are helpful for both teachers and students: teachers can use them when designing lesson plans and grading assignments; students can use them to make sure they meet the learning expectations and requirements of an assignment or project work. Rubric making should not be a complicated task . . . (read more)

Collaboration is More Than Busy Work

I know there are some who are reading this whose opinion of collaborative exercises is low, that is assuming they read this at all!  I have to confess that I have seen some collaborative exercises/assignments that really were nothing more than busywork, or worse.  It is a fact that any collaborative exercise or assignment that doesn’t have clear learning outcomes probably fits that description.

However, I’m glad to say, that is not the norm.  When well designed and thought through, collaborative exercises/assignments are powerful tools to achieve student learning, particularly with adults.  There are quite a few posts in this category already here on the faculty blog (simply click on the Collaborative Teaching Ideas link under Categories to the right) and many more examples of excellent activities can be found by searching the web.

But I want to reinforce the importance of having clear learning outcomes before adding these activities.  I’ve said this before and I truly believe it, collaborative teaching can feel like controlled chaos, and sometimes only marginally controlled!  Without the boundaries of clear learning outcomes, the can quickly activities deteriorate into a waste of classroom time.

It takes some time to effective plan and implement these activities – which is one of the reasons I think many Instructors eschew them entirely or find them ineffective when they do try them.  Planning the outcomes, and then designing the activity so that it achieves the outcomes, including the debriefing which is a big part of the learning, can make connections for adult learners that just don’t happen through lecture.

So here is the process I use:

  1. What is the subject or topic that I want to reinforce/teach?
  2. What do I want the student to walk away knowing? This is the learning outcome and I put this down in a clearly written sentence.
  3. Think about what learning activity can I use which will get the students to engage the topic or subject.  Sometimes it is a hands on experience, other times it requires movement, other times it can be problem based or through role playing or debates.  There really are so many options that it is hard to list them all.  I have included a longer list under Faculty Resources/White Papers titled Collaborative Teaching Options.
  4. Work out the plan for implementing the exercise in class including resources you need to bring with you and how much time it will take.  It usually takes a few times to get the time figured out correctly.
  5. Conduct the exercise, being cognizant that things can drift out of control and you need to stay engaged and provide direction.  It is not “Practice that makes Perfect,” but “Guided practice that makes perfect.”
  6. Debrief the exercise and hone in on the learning outcome by asking questions that direct the students to think about the exercise in relationship to what you wanted them to come away with.  You may want to plan your debrief questions ahead of time.
  7. Refine the exercise for the next time you use it.

I hope you’ll give it a try.  It can be amazingly rewarding to see the light come on in a student’s eyes as they engage in the debrief and make a crucial connection to their life.

CWV: Practical Applications for the Classroom

by Paul Criss,
Dean of Faculty, Memphis and Desoto

This is a summary of the Webinar by the same title presented by Dr. Criss on May 17, 2016.  You can view the webinar at this link.  There are handouts that can be downloaded from within the webinar.

This webinar is an overview of worldview principles and how to apply them in the adult learner classroom. The presenter is Dr. Paul Criss who possesses sixteen years of experience teaching higher education worldview courses. The presentation begins with an overview of worldview discovery, the Christian Theistic worldview, and criteria for a well-defined personal worldview. Some questions answered in the first half are:

  • How is a worldview like a belly button, a cerebellum, or breathing?
  • What are the essential aspects of a worldview and why is it important?
  • How does an adult learner decide which worldview is best?
  • What is the faculty member’s role in worldview instruction?

The second half of the webinar includes a process to analyze ideas and concepts, as well as practical tools to use in the classroom, such as: CWV Integrated Lesson Plan, Cultural Analysis, Immunization Technique, Reflective Action, KWAT discussion, and Integrative Questioning. The presentation closes with an overview of resources (including discipline specific resources) and websites that have assisted the presenter in the past.

I encourage you to watch the recorded webinar and download the attached documents.

Using Bloom’s Taxonomy to Foster Critical Thinking

by Elizabeth Juneau
Co-presenter with Dr. Jerald Meadows
Webinar:  Using Bloom’s Taxonomy to Foster Critical Thinking

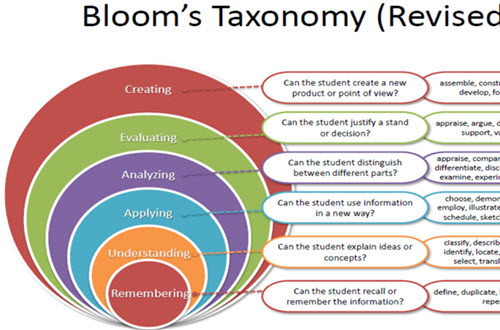
Bloom’s Taxonomy was named for Benjamin Bloom, who created the taxonomy in 1956, revised in 2000. The taxonomy has different domains, but our focus is the cognitive learning domain. The cognitive domain has seven levels:

  1. Knowledge/Remembering- Basic recall and remembering of facts
  2. Comprehension/Understanding- Understanding of facts and ideas
  3. Application/Applying- Making use of the knowledge and information; problem solving
  4. Analysis/Analyzing- Examining and breaking apart information; making inferences and giving evidence to support a claim
  5. Synthesis/Evaluating- Making a judgement regarding the information; defending opinions and judgements
  6. Evaluate/Creating- Producing and generating ideas independently using knowledge and information; thinking abstractly

When using Bloom’s Taxonomy to plan lessons, begin with your end in mind. What is the goal for your lesson? Your unit? Do you want to cover more than one level in a lecture? What about the end of your course? What do you want your students to gain? By utilizing Bloom’s Taxonomy, you can create a road map of where you want to go throughout the course of your individual lectures, modules, and course as whole.

I currently teach sixth grade gifted students in Alabama. For the month of October, our focus in English was Edgar Allen Poe and scary stories, discussing character and plot development, figurative language, and analysis of a piece of literature. I knew, by the end of the unit, I wanted my students to create their own scary story (Level 6) to demonstrate mastery of the skills. I then used each level to scaffold my lessons to get my students to that level. Here are some sample questions I used to guide them through the levels of Bloom’s:

  1. Knowledge/Remembering: Tell me the main events in “The Cask of Amontillado” and “The Masque of the Red Death”
  2. Comprehension/Understanding- Compare and contrast Montresor of “The Cask of Amontillado” and Prince from “The Masque of Red Death”
  3. Application/Applying- Sketch a picture of the Prince’s apartment according to the description in “The Masque of the Red Death.” Interpret what each color room represents.
  4. Analysis/Analyzing- Which story do you feel makes the best use of figurative language to create a feeling of uneasiness and suspense? Cite evidence from the text.
  5. Synthesis/Evaluating- Were Prince’s actions in “The Masque of the Red Death” noble? Why or why not?
  6. Evaluate/Creating- After several weeks reading selections by Poe, discussing plot and character development, mood, and tone, students will write their own scary/suspenseful short story.

Bloom’s Taxonomy also creates a level of accountability for the instructor and the students. By clearly laying out the goals for you students at each level, they can see how each part of the course works together and then how to relate what they are learning to other aspects of their coursework. As you move through your course, you can relate the information to other courses, recall back to previous levels if students are stuck “Remember this from a week ago, try thinking about it in a new way…”, and also reference the information and knowledge with clues to say “This bit of information will be used later in in your project this way….”

It is important to remember, the goal in using Bloom’s is to guide your learners up through the taxonomy, gaining and utilizing their knowledge at each level. You can’t skim over levels, then you may run the risk of students not fully grasping the information or knowing how to apply it. As students move forward, mastering each level, they are able to take control of their learning, take control of the information and knowledge presented, the student can be empowered, growing a student in their knowledge, but growing as an individual who is capable of so much more than we or they can believe.

For other information about using Bloom’s to enhance your Collaborative Learning Strategy (CLS) check out this matrix of verbs which identify the level of Blooms.  Also, if you weren’t able to attend the webinar, please check it out at the link above.

There is ALWAYS More Than One Way to Skin a Cat

I first became aware of scotomas through reading Steven Covey’s 7 Habits of Highly Effective People.  (A book, by the way, that I consider a MUST read for anyone interested in personal improvement and professional competency.)  In Covey’s book, there is a picture that may be perceived by some as a fashionable young lady, or the face of an old crone.  Although the actual definition of scotoma has to do with a partial alteration in a field of vision, it can also be used metaphorically, “The common theme of all the figurative senses is of a gap not in visual function but in the mind’s perception, cognition, or world view.” (Wikipedia)

Since then I’ve run across the concept in various places and have referenced it in many presentations and sermons.  It is all about perspective.  The most interesting thing about this concept is how difficult it is to realize when you are locked into one way of perceiving a situation.  Take the picture above for instance.  When you first see the picture you immediately perceive either the young stylish woman or the old crone.  There is no thought in your mind that the other possibility even exists.

I find myself pondering this from time to time when faced with challenges at work, life in general,  or when I’m putting together my Collaborative Learning Strategy in preparation to teach.  In those times I try to allow my mind to open to new possibilities and other perspectives.  Usually with a little effort I can find a new path, often one better than the original.

I often wonder how many missed opportunities have come my way simply because I had a scotoma which kept me from seeing alternatives.  I am saddened to think of the number of students I’ve taught who could have embraced the material at a deeper level if I had only taken the time to come at it from a different direction, or using a different way of presenting the information.

The lesson for me, and one that I seem especially slow to learn, is to slow down consider other perspectives.  A good way to do this is to get other opinions.  I have to confess when I was younger I often avoided getting other opinions because I: a) already knew it all, b) didn’t want to listen to anyone else, or c) was afraid that someone would discover a flaw in my plan.  As I grown older and somewhat wiser I’ve learned to not feel as threatened by other’s ideas.  Taking the time to garner this kind of input is still a weakness for me . . . I typically want to move NOW.  But, the benefit is that in getting the input the decision is usually better.  For Instructors, take the time to brainstorm together on ways to present a topic, I’m confident you and your students will benefit from it.


Keep you eyes open, there is always a different perspective on any situation and a different way to do anything – even teach; to put it in layman’s terms, “there is always more than one way to skin a cat.”